
In one sentence: When a tested side of your iron condor gets challenged, you have three real options - roll the untested side for more credit, close just the losing spread, or take the whole loss - and picking the wrong one is usually what turns a small, planned loss into a big, unplanned one.
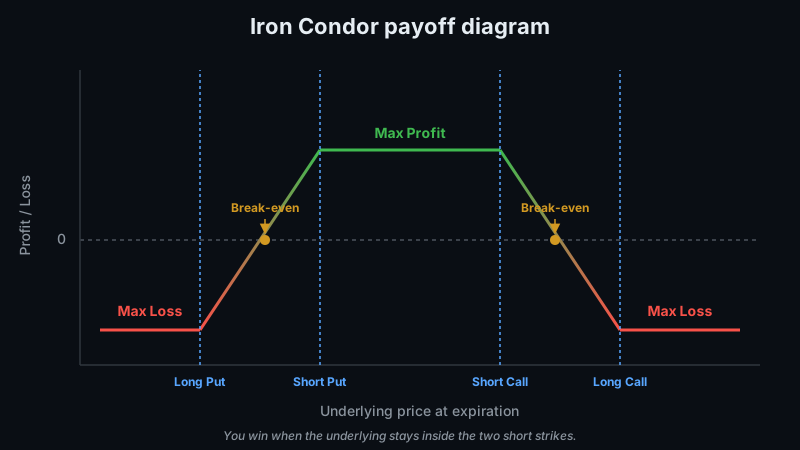
If you read our entry-level breakdown of iron condors, you already know the setup: SPY at $500, we sold the $495/$490 put spread and the $505/$510 call spread for a combined $1.80 credit ($180 per condor), with a $320 max loss and break-evens at $493.20 and $506.80, expiring in 35 days. That article covered how to build the trade. This one covers what happens next - because a condor that just sits there untouched for 35 days is the exception, not the rule.
Let's pick the trade back up 12 days in. SPY has rallied to $503. The put side ($495/$490) is comfortably out of the money and has decayed hard. The call side ($505/$510) is now the one under pressure - SPY is just $2 away from the short $505 call, with 23 days still left on the clock.
The three responses to a tested side
Every iron condor management decision boils down to one of three moves. None of them is universally "correct" - the right call depends on why the strike is being tested and how much room you have left.
1. Roll the untested side toward the tested side
Since the put spread has lost most of its value, you can buy it back cheap and sell a new, closer put spread for additional credit. This does two things: it adds to your total credit collected, and it raises your overall break-even cushion on the side that isn't in trouble - assuming price stays inside the new range.
2. Close just the tested spread
You can buy back the call spread that's under pressure and simply let the put spread ride to expiration on its own. This locks in a known loss (or small gain) on the call side and removes that risk entirely, while keeping the safer put spread's remaining credit in play.
3. Close the whole condor and take the loss
If the reason you put the trade on - a range-bound, low-catalyst SPY - is no longer true, the right move is often to exit both spreads and accept the loss. Fighting a trade whose premise has broken is how small, defined losses turn into the max loss you were trying to avoid.
Working through the roll: real numbers
Let's assume the technical picture still supports "SPY is range-bound, this was just a poke toward $505, not a breakout." Under that read, rolling the put side up to collect more credit is a defensible move.
At SPY $503, we buy back the $495/$490 put spread (now cheap) and sell a new $498/$493 put spread - still $5 wide, moved up 3 points - for an additional credit of $0.60, or $60 per condor.
Original net credit: $180
Additional credit from the roll: $60
New total credit collected: $240
Unchanged upper short strike: $505 call
New lower short strike: $498 put (up from $495)
The position now needs SPY to hold below $505 and above $498 through expiration - a tighter range than the original $495-$505 window, but with $60 more in the bank if it works. That's the honest trade-off of a roll: you're paid more, but you've given yourself less room underneath before the put side gets tested too.
It also changes your risk picture. If SPY reverses hard and breaches the new $498 short put instead, the effective max loss on that side is $500 (the width of the put spread) minus the combined put credit of $90 (original) and $60 (roll), or $150 - leaving a max loss of $350 if the put side is the one that ends up breached. The call side is a separate, still-open risk of its own, capped near the original $320 total exposure if both sides eventually go wrong. In plain terms: the rolled position collects more premium and buys some short-term breathing room on the call side, but it does not create free money - it's a trade of a wider net credit for a narrower two-sided range. No options strategy removes the risk of loss, and a roll that looks good on day 12 can still lose on day 30 if SPY reverses toward the new put strike.
SPY at trade entry: $500
SPY 12 days later: $503
Original max loss: $320
New put-side max loss after roll: $350
Total credit collected so far: $240
When to defend versus when to fold
The decision tree is less about the price action itself and more about whether your original reason for the trade still holds.
- Defend or roll when: the tested strike gets touched or slightly breached, but the broader picture - low realized volatility, no catalyst, a range that's held for weeks - is still basically intact. A single push to $503 with light volume, no news, and a market still chopping is a candidate for rolling rather than panicking.
- Close and take the loss when: price breaks a key level on real volume, signaling a genuine trend rather than a random poke. A close above $505 on expanding volume, breaking a level that had held for weeks, is a different animal than a two-day drift.
- Close and take the loss when: a catalyst has entered the expiration window that wasn't there at entry - an earnings date, a Fed decision, a surprise headline. The entire premise of an iron condor is "nothing big happens." If that stops being true, the trade's edge is gone regardless of where price currently sits.
- Close and take the loss when: the condor has already hit your predefined stop. If the original entry plan called for a 2x-credit stop, that means closing once it costs $360 to buy back the whole condor (2x the original $180 credit) - a mechanical rule that takes the emotion out of "maybe it comes back."
The common thread across all three "close" triggers is that they're about the market changing, not about being annoyed that a trade is temporarily red. A tested strike that's still inside a boring, range-bound tape is a very different signal than a tested strike backed by volume and a broken level.
How GenZTrade helps you find these setups
Managing a four-leg position by hand - tracking two spreads, a moving break-even, and a stop level - is where a lot of iron condor traders lose the thread. The Cockpit tracks the position against both your 50 percent profit target and your 2x credit stop automatically, and pings you the moment either one fires, so you're not eyeballing four legs and doing spread math in your head while SPY is moving.
Before deciding whether a tested strike deserves a roll or a full close, the Regime chip flags when chop conditions are starting to break down into a trend - which is exactly the distinction between "defend it" and "get out" described above. And once a strike like $505 is under pressure, High Volume Points shows whether that level is sitting below or above a real, volume-confirmed support or resistance zone, rather than just a round number - useful context for deciding whether the poke is likely to hold or extend.
Bottom line
Rolling the untested side of a tested iron condor can raise your total credit and give you a bit more room on the side that's under pressure, but it also narrows your two-sided range and shifts risk rather than eliminating it - in this example, trading a $320 max loss for a tighter window and a $350 max loss on the put side if it reverses. There is no version of iron condor management that removes the possibility of a loss; the goal is simply to make the loss the one you planned for, at the size you planned for, instead of the max loss you were trying to avoid in the first place.
Comments (0)